Introduction
Microsoft Outlook becomes most significant medium of communication in this digital era. Nowadays, users prefer to store their data in Outlook. While using MS Outlook, users face common issues such as the rise in OST file size. Offline Storage Table contains all local copies of emails, attachment or other data. As per the default setting, it saves data consistently in the C: Drive. Data increases gradually over time therefore, C: Drive is full because of Insufficient disk space. This not only slows down Outlook but can also cause the entire Windows OS to lag or hang due to low disk space.
And if you want to get rid of this situation, then you have to move OST file to Another Drive (D: Drive/E: Drive). Thereby, it resolves all the issues such as data safety, degraded performance, space issues and more. However, users face another challenge regarding how to move it. Because Outlook prohibit drag and drop option. Hence, in this blog, different smart ways of moving the OST file will be discussed.
Also Read: Fix “Synchronization of OST Files” Error
Why Do We Need to Move the OST File to Another Drive on Windows?
• Free Up Space on the Primary Drive (C: Drive): Normally operating system and many applications reside on your C: drive. Sometimes the OST file size grows to several gigabytes which takes up valuable space. Moving content to another drive (like D or E) frees up space, which can improve the system’s overall performance.
• Improve System Performance: Increasing C: Drive storage leads to slower performance, decreased efficiency and general system unresponsiveness. Shifting data to another drive will remove all these challenges.
• Prevent Data Corruption: If the C: Drive detects an issue with sectors and heavy fragmentation, there will be a risk of OST file corruption. Relocating the data in separate Drive, it Diminish the chance of Corruption.
• Organizational Purposes: If you have multiple drive for archiving data and allocate a dedicated drive for every data category, it helps to maintain better organization and makes all tasks easier to handle with any hurdles.
What Are the Top Solutions to Move OST File to Another Drive?
1. Manual Method: Utilizing Outlook Account Settings
This is the most commonly used and recommended technique for moving the OST file manually. In this approach, the default location is being altered within Outlook.
Steps:
1. Close Outlook: Make sure that Outlook is shut down completely before proceeding.
2. Open Control Panel.
Hit Windows Key + R, type control, and press Enter button.
User can search for Control Panel in the Windows search bar.
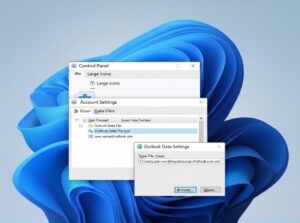
3. Go to Mail Setup:
In the Control Panel, you should set the View by option to Large icons or Small icons to find Mail (Microsoft Outlook 20XX) on the list. Click on it.

4. Open Account Settings: In the Mail Setup Outlook dialog box, click on Email Accounts.
5. Go to Data Files Tab: In the Account Settings window, go to the Data Files tab. Here you will see a list of all data files associated with your Outlook profiles.
6. Locate and Change Location: Select the OST file you wish to move. Click on Settings. This will open a dialog box with the path to your current OST file. Click on Move.
Navigate to the desired location on another drive (e.g., D:\Outlook_Data). If you don’t already have a folder, make one. Highlight the folder and click “OK”. This will relocate the file to its new location and reset its configuration options.
7. Restart Outlook: After completing this step restart Outlook. Outlook should open and start working with the OST file located at its new position.
2. Using Symbolic Links (Advanced Manual Method)
This method is for more advanced users, as it involves the creation of a “shortcut” that deceives the Outlook email system into believing the file exists in the original location when in fact it has been relocated.
Close Outlook.
Moving the OST file: You can manually cut the file containing the name [yourprofile].ost from the original location (e.g., C:\Users\%username%\AppData\Local\Microsoft\Outlook) to your new location.
Open Command Prompt as an administrator: Just search for “cmd” in the Windows search bar, right-click on it, and click run as administrator.
Create a Symbolic Link: To create a symbolic link, you need to type this command and press Enter
mklink “C:\Users%\username%\AppData\Local\Microsoft\Outlook[yourprofile].ost” “D:Outlook_Files[youractual username, OST filename and new path).
Restart Outlook.
Although effective, the technique demands the precise execution of commands. Otherwise, problems will be created.
If the Manual Method Fails to Move the OST File
Sometimes, the manual method may not work as expected especially when it is in a corrupt or orphaned condition. And you are hassle with a large database. In these scenarios, users can try expert-recommended tools for reliable results. TrustVare OST to PST Converter is a trustworthy software, its primary function is to convert OST files into PST file format or a powerful solution to manage and protect the data from Malware and threats. This application moves OST file to another drive without creating any issues. It resolved all common issues that users face during relocation such as creating a new OST file, permission problems, corrupt or damaged Outlook profile errors, performance and sync issues, Outlook errors, risk of corruption and data loss and more.
Steps to Change the Location of the OST Data File
Step 1: Initially, install the software on the system and launch it
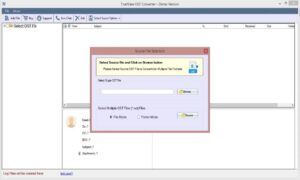
Step 2: Then, open the application and click the Select OST File option
Step 3: Select the file or folder option as per your requirement
Step 4: It shows a complete preview of your mailbox like emails, contacts, calendars, tasks, notes and more.
Step 5: Then, select the file format in which you have to convert your data
Step 6: Click on the browser button to select the location of your data D:\Outlook_Data.
Step7: Now, hit the Convert Now Button
Note: This tool will move OST file to Another Drive
Why do experts recommend using the Automated Way?
- It provides Safe & Secure Conversion
- Capability to handle large and corrupt files
- Give a selective conversion and preview option
- Reliable and user-friendly tool
- Avoids errors and Sync Issues
Conclusion
However, there are several drawbacks to manually moving the OST file to another drive, which can be risky, tricky and may result in failure due to corruption, permissions, or errors in Outlook. However, with this professional solution, it’s safe, reliable and user-friendly to move OST file to Another Drive. It will convert your OST into portable PST format, handle large and corrupt files, enable selective transferring of mailbox items and keep data long-term safe and accessible. By using software, you will not only move your Outlook data but also keep errors and synchronization issues, thus becoming the best option for anyone who wants their OST file managed in a hassle-free and secure manner.
FAQs
1. Is it safe to move the data using TrustVare?
Yes, it is a 100% safe and secure application that can easily move the data to another drive without any risk.
2. Does TrustVare handle corrupted or large OST files?
Yes, it efficiently converts damaged or large OST files without any hassle or data loss.
3. Can a non-technical user also operate this application?
Yes, even a non-technical user can operate this application without any special technical knowledge.
4. Does it preserve all the data?
Yes, it smoothly preserves all mailbox data including emails, contacts, calendars, and attachments without any errors.